Zeppelin源码分析——主要的class分析
文章目录
- Interperter
- RemoteInterpreterService
- InterpreterGroup
- RemoteInterpreterProcess
- RemoteInterpreter
- InterpreterInfoSaving
- InterpreterSetting
- SparkInterpreter的Shared/Scoped/Isolated模式
- InterpreterOption
- InterpreterFactory
- Note
- Paragraph
- Notebook
- NotebookServer
- ZeppelinServer
- NotebookRepo以及Note持久化子系统
- SearchService以及Note的全文检索子系统
zeppelin的module、package、class众多,如何快速地理清头绪,抓住重点?本文分析zeppelin主要module中重点的类以及它们之间的关系,理清这些类的职责,对于理解zeppelin的运行过程至关重要。
经过之前文章的分析,我们已经了解了zeppelin涉及到框架层面的几个module为:zeppelin-server、zeppelin-zengine、zeppelin-interpreter,并且三者之间有如下的依赖关系:
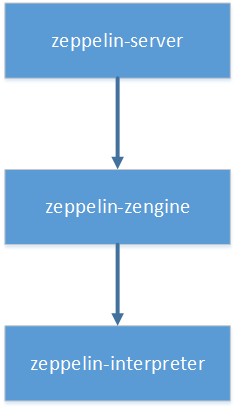
本文要分析的主要的class,也都来自于这三个module。

以上类图中省略了字段和方法,以避免过早引入太多细节,重点关注类与类之间的关系组成。由于篇幅的限制,再加上zeppelin提供的核心价值是与Interpreter相关的多语言repl解释器,笔者就选择从右上角黄色的区域开始,分多篇分析。
Interperter
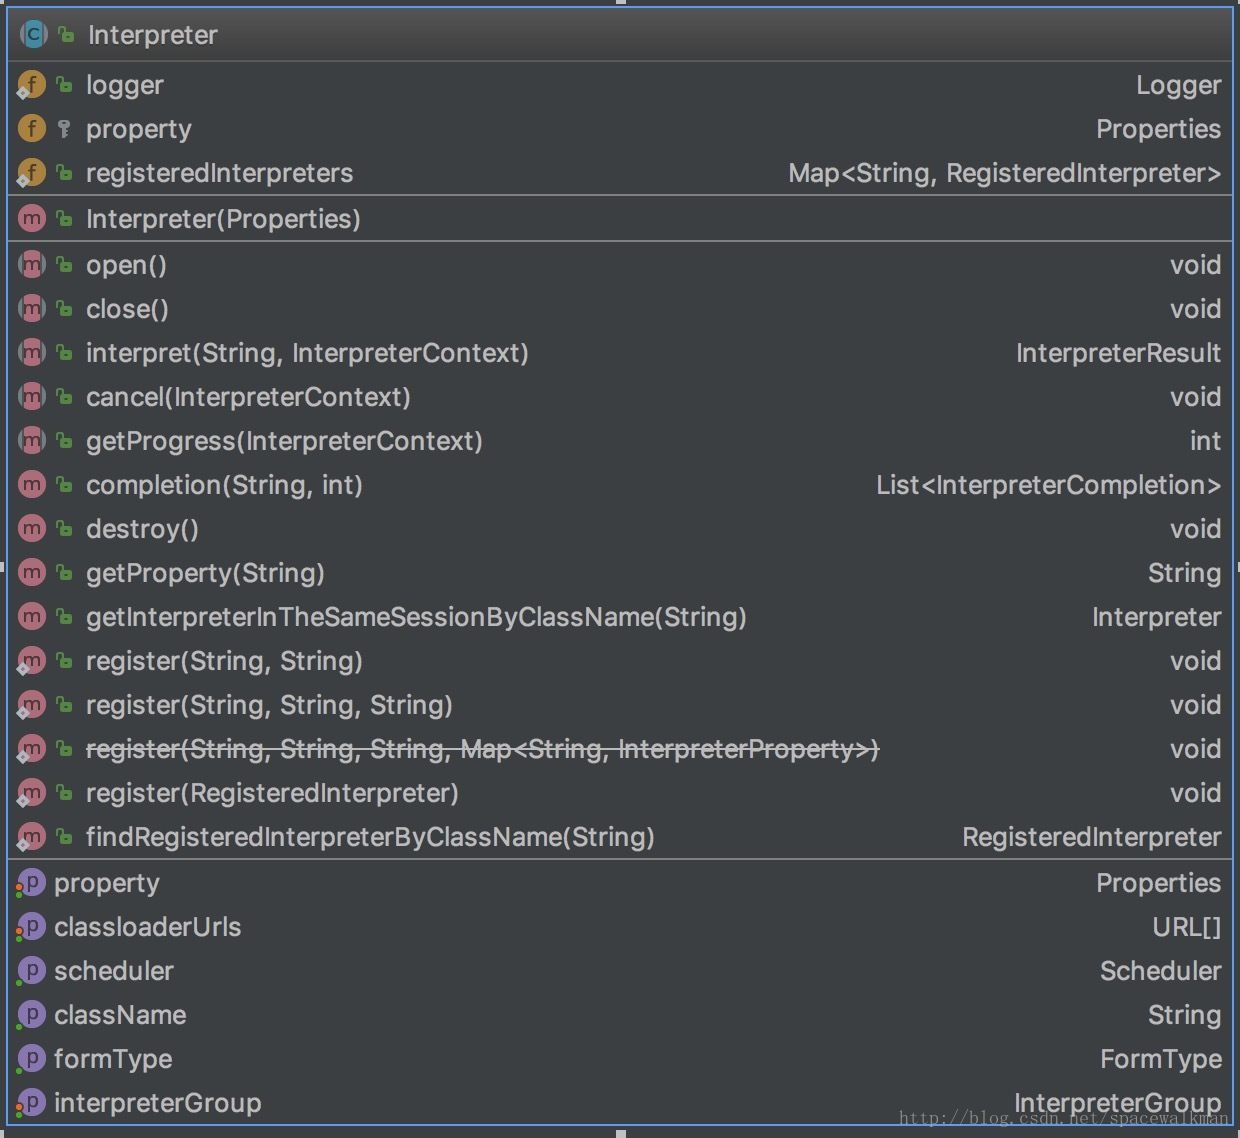
Interpreter是一个抽象类,该类是zeppelin核心类,Zeppelin提供的核心价值:解释执行各种语言的代码,都是通过该抽象类的每个具体的实现类完成的。Interpreter主要规定了各语言repl解释器需要遵循的“规范(contract)”,包括:
- repl解释器的生命周期管理。如open(), close(), destroy(),规定了产生和销毁repl解释器。
- 解释执行代码的接口——interpreter(),这些真正产生价值的地方。
- 执行代码过程中交互控制和易用性增强,如cancel(), getProgress(), completion(),分别是终止代码的执行、获取执行进度以及代码自动完成。
- 解释器的配置接口,如setProperty()、setClassLoaderURL(URL[])等。
- 性能优化接口,如getScheduler(),getIntepreterGroup()等。
- 解释器注册接口(已经deprecated了),如一系列重载的register接口。
以上体现了zeppelin的repl解释器进程需要受其主进程ZeppelinServer的控制,也是zeppelin设计决策在代码中的体现。
注:现在的解释器注册通过如下2种方式进行:
- 将interpreter-setting.json打包到解释器的jar文件中
- 放置到如下位置:interpreter/{interpreter}/interpreter-setting.json
RemoteInterpreterService
Thrift协议分析
Apache Thrift是跨语言RPC通信框架,提供了相应的DSL(Domain Specific Language)和支持多种语言的代码生成工具,使得代码开发人员可以只关注具体的业务,而不用关注底层的通信细节。zeppelin使用Thrift定义了其主进程ZeppelinServer与需要采用独立JVM进程运行的各repl解释器之间的通信协议。
关于为什么要采用单独的JVM进程来启动repl解释器进程,本系列的第3篇也有提及,这里再赘述一下:
- zeppelin旨在提供一个开放的框架,支持多种语言和产品,由于每种语言和产品都是各自独立演进的,各自的运行时依赖也各不相同,甚至是相互冲突的,如果放在同一JVM中,仅解决冲突,维护各个产品之间的兼容性都是一项艰巨的任务,某些产品版本甚至是完全不能兼容的。
- 大数据分析,是否具有横向扩展能力是production-ready一项重要的衡量指标,如果将repl进程与主进程合在一起,会严重影响系统性能。
因此,在有必要的时候,zeppelin采用独立JVM的方式来启动repl进程,并且采用Thrift协议定义了主进程与RemoteInterpreterService进程之间的通信协议,具体如下:
1 | service RemoteInterpreterService { |
与前面的Interpreter类的定义进行对比不难发现,RemoteInterpreterService Thrift接口与Interpreter抽象类定义的接口大部分相同,不同之处在于:
- RemoteInterpreterService接口的实现类由于运行在不同的JVM中,需要在每个接口方法中额外传递环境信息,如noteId和className等,如createInterpreter、open、close、cancel等。
- RemoteInterpreterService接口中多出了两种类型的接口,一种是为了完成ZeppelinServer进程和RemoteInterpreter进程之间的resource协商(neigotiation),如resourceXXX接口;另一种是为了完成2者之间angular object的前后台双向绑定,如augularXXX接口。
具体文件位置见:
${ZEPPELIN_HOME}/zeppelin-interpreter/src/main/thrift/RemoteInterpreterService.thrift。在其同级目录下,zeppelin还提供了代码生成脚本genthrift.sh:
1 | thrift --gen java RemoteInterpreterService.thrift |
可以看出,
${ZEPPELIN_HOME}/zeppelin-interpreter/src/main/java/org/apache/zeppelin/interpreter/thrift目录下所有文件都是Thrift的代码生成器根据该接口文件自动生成的。如果我们修改过该接口文件,则需要重新执行该脚本。
InterpreterGroup
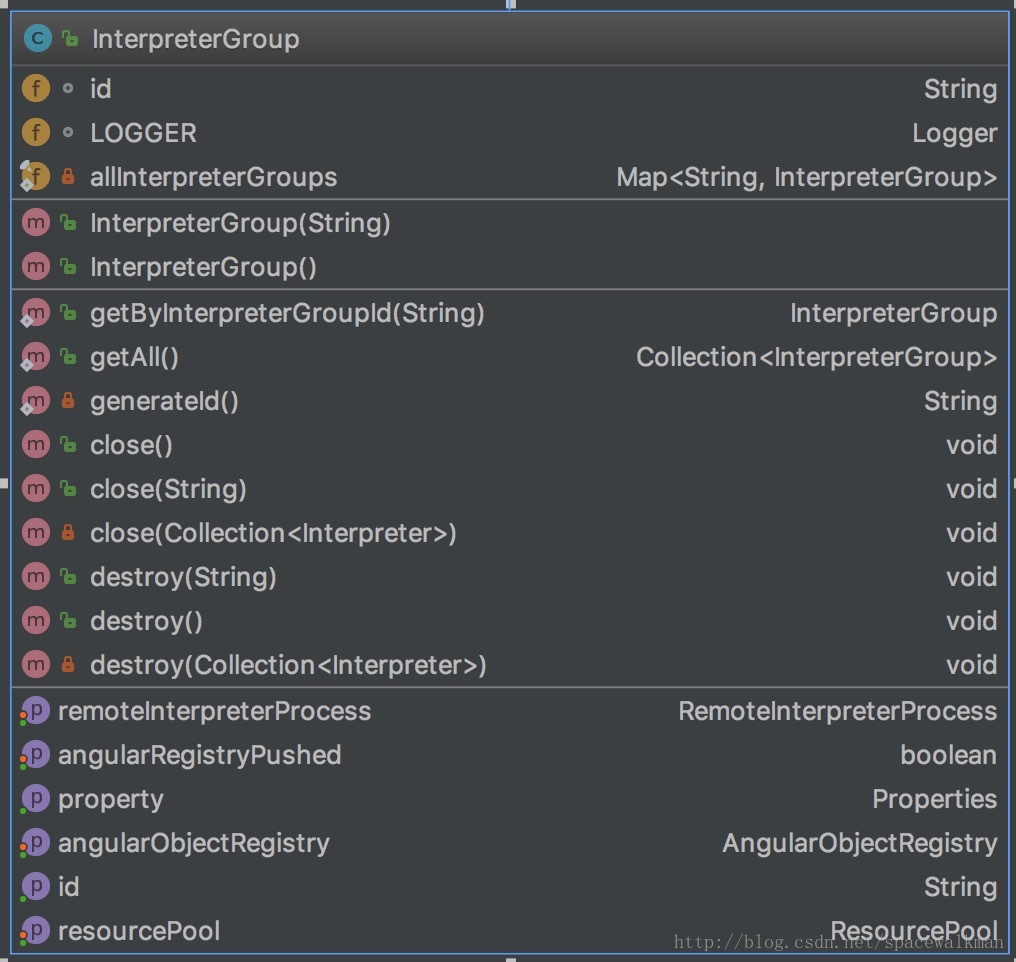
InterpterGroup继承了ConcurrentHashMap
RemoteInterpreterProcess
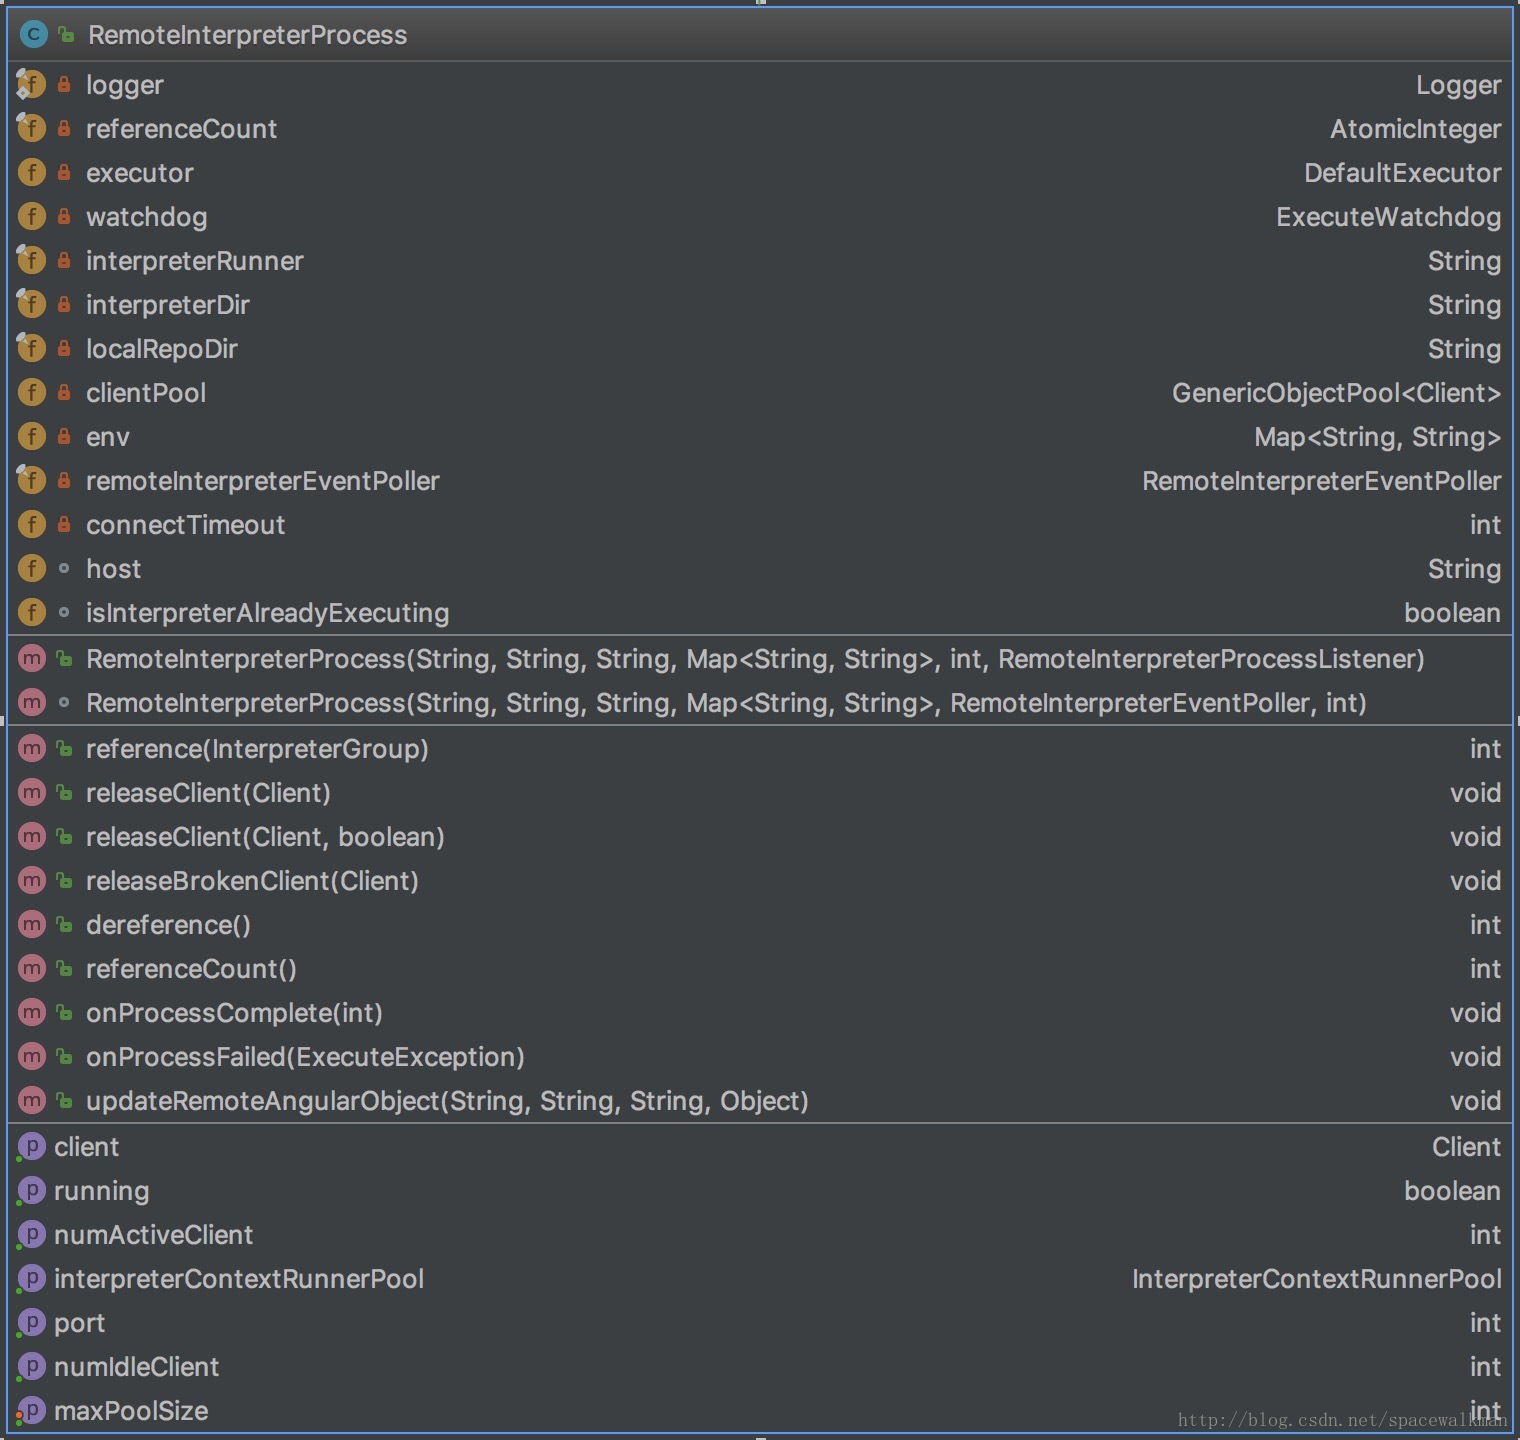
RemoteInterpreterProcess是采用独立JVM启动repl进程的具体执行类,它采用Apache Commons Exec框架来根据Zeppelin主进程的”指示”启动独立进程,具体逻辑如下:
1 | port = RemoteInterpreterUtils.findRandomAvailablePortOnAllLocalInterfaces(); |
这里有几点主要注意:
- 该进程端口是zeppelin自动寻找操作系统中当前可用的端口
- RemoteInterpreterProcess并非在在构造函数中,就启动JVM,而是在被引用(reference方法被调用)之后,才启动的
- 具体的interpterRunner脚本为${ZEPPELIN_HOME}/bin/interpreter.sh,参见 ZeppelinConfiguration.getInterpreterRemoteRunnerPath()
interpreter.sh文件重点部分如下:
1 | ##省略环境变量和classpath拼接等内容 |
可以看出,在单机环境下,主要是在启动单独JVM进程,执行RemoteInterpreterServer,并向其main方法,传递必要的参数。在spark环境下,我们会单独分析,此处暂时略过。
RemoteInterpreter

RemoteInterpreter可能是zeppelin中最误导人的类命名了,笔者认为其命名为RemoteIntepreterProxy,或者是InterpterProxy、InterpterStub更合适一些,因为其本质是远程Interpter的本地代理,是Proxy模式的典型应用,其运行在zeppelin主进程中,通过Thrift服务的Client来控制远程Interpreter的执行。
通过其初始化代码,可见一斑:
1 | //省略掉了出错处理等其他内容 |
InterpreterInfoSaving
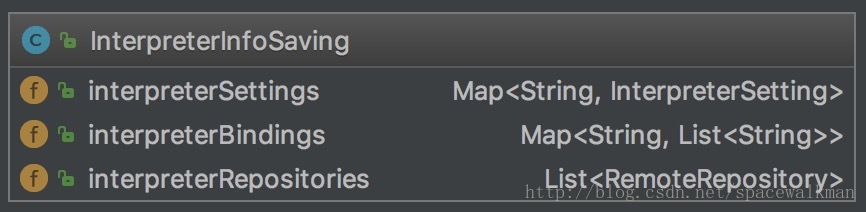
InterpreterInfoSaving是一个convenient类(提供的功能可以由其他类组合完成,设计目的是为了方便调用),定义其目的就是为了将原来分散存储在各个interpreter子文件夹中的InterpreterSetting、intepreterBindings和interpreterRepositories集中到一处,方便进行查找和持久化。
原来Interpter的注册方式是static注册方式:即每个Interpreter的实现类都定义一段static初始化段,在该类被第一次加载的时候,将其注册到zeppelin中。例如:下面是Python interpreter的注册代码。
原来Interpter的注册方式是static注册方式:即每个Interpreter的实现类都定义一段static初始化段,在该类被第一次加载的时候,将其注册到zeppelin中。例如:下面是Python interpreter的注册代码。
1 | static { |
现在这种方式已经Deprecated了,新的Interpreter采用了json配置文件的方式来保存这些配置,并且由zeppelin加载时来解析这些配置,该文件约定为interpreter-setting.json,该文件可以放到如下2种位置:
- 作为main resources打包到interpreter的jar包中
- 将其放到${ZEPPELIN_HOME}/interpreter/{interpreter}/interpreter-setting.json,位置下
interpreter-settings.json就近与interpreter的jar包存储在一起,符合封装的原则,但是zeppelin需要知道全局已经注册了哪些interpreter,以及这些interpreter的配置
InterpreterInfoSaving类的唯一实例会被持久化到${ZEPPELIN_HOME}/conf/interpreter.json文件,如下图:
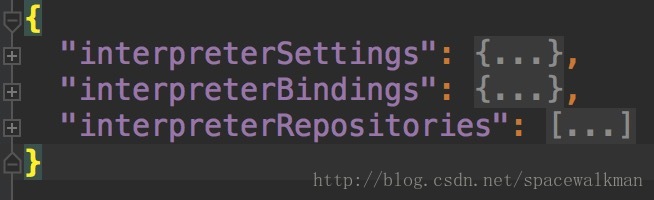
可以看出,InterpreterInfoSaving类是${ZEPPELIN_HOME}/conf/interpreter.json持久化文件相对应的内存对象。
InterpreterSetting
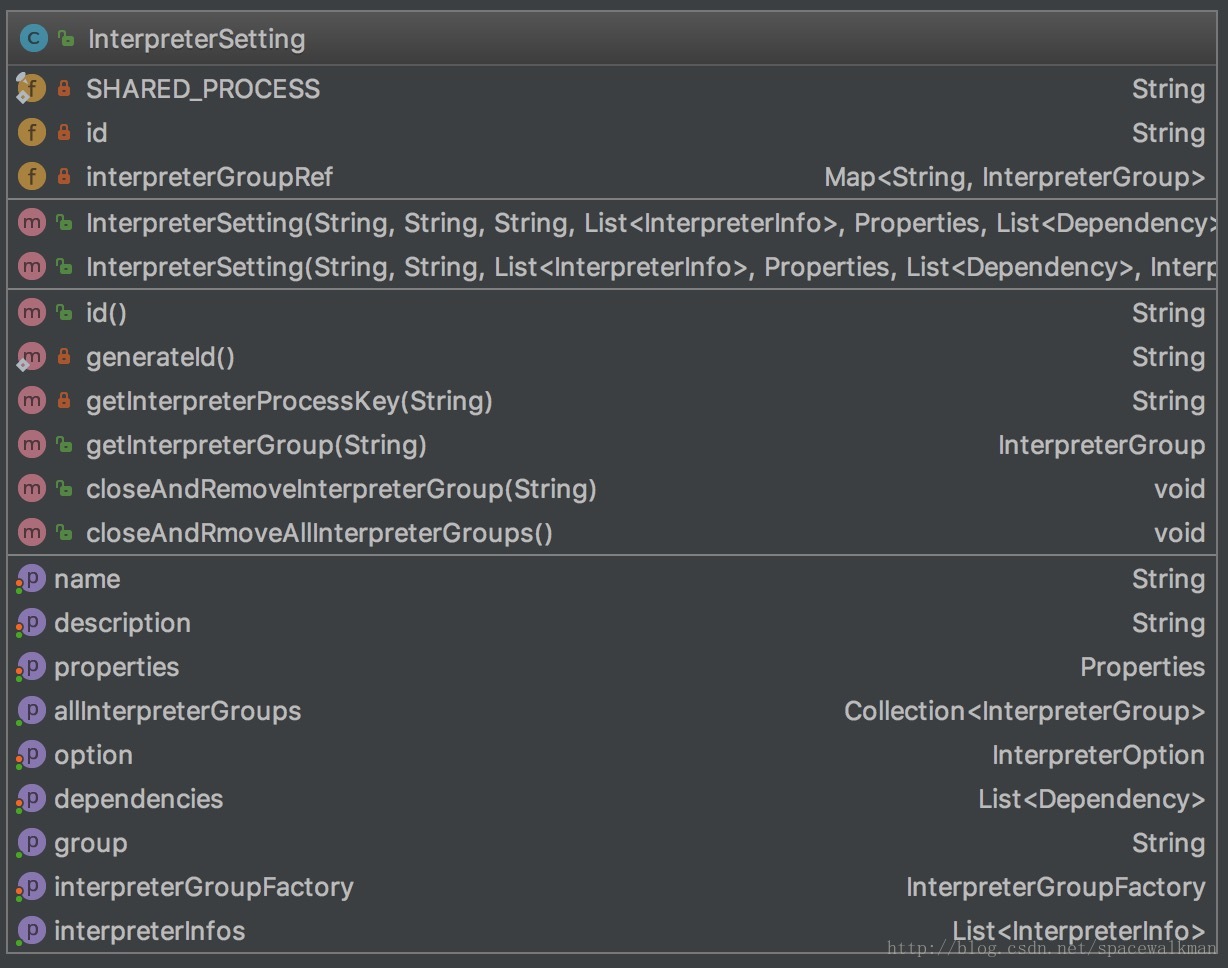
InterpreterSettings是一份Interpreter创建的”contract”,其职责如下:
- 维护了interpreter相关的元信息,这些信息对于正确运行intepreter进程至关重要,如:与外界环境进行交互(如spark on Yarn集群)、第三方依赖加载等
- 维护了note和intepreterGroup之间的关系
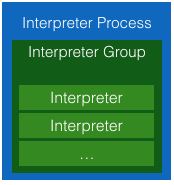
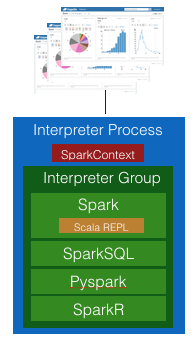
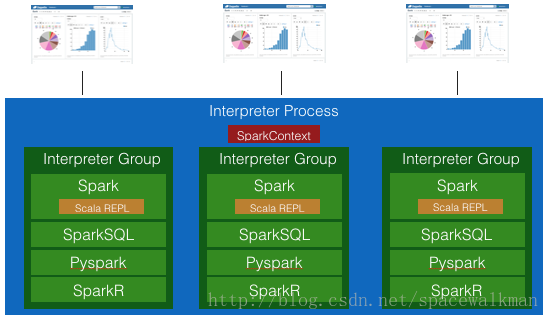
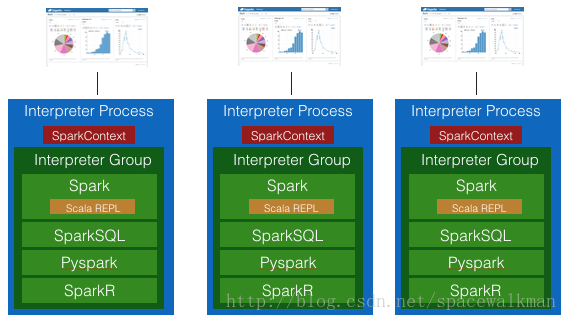
上篇中我们提到InterpreterGroup是创建jvm、note bind的最小单位,因此,也就决定了在多个note时,创建jvm的个数以及在多个note之间进行变量共享的程度。每个interpreter进程可以有一个或者多个interpreterGroup,每个interpreter实例都从属于其中某一个InterpreterGroup。三者之间的关系如下图:
如下是spark interpreter的settings:1
2
3
4
5
6
7
8
9
10
11
12
13
14
15
16
17
18
19
20
21
22
23
24
25
26
27
28
29
30
31
32
33
34
35
36
37
38
39
40
41
42
43
44
45
46
47
48
49
50
51
52
53
54
55
56"2C6QR3FVF": {
"id": "2C6QR3FVF",
"name": "spark",
"group": "spark",
"properties": {
"spark.executor.memory": "",
"args": "",
"zeppelin.spark.printREPLOutput": "true",
"spark.cores.max": "",
"zeppelin.dep.additionalRemoteRepository": "spark-packages,http://dl.bintray.com/spark-packages/maven,false;",
"zeppelin.spark.importImplicit": "true",
"zeppelin.spark.sql.stacktrace": "false",
"zeppelin.spark.concurrentSQL": "false",
"zeppelin.spark.useHiveContext": "true",
"zeppelin.pyspark.python": "python",
"zeppelin.dep.localrepo": "local-repo",
"zeppelin.interpreter.localRepo": "..//local-repo/2C6QR3FVF",
"zeppelin.R.knitr": "true",
"zeppelin.spark.maxResult": "1000",
"master": "local[*]",
"spark.app.name": "Zeppelin",
"zeppelin.R.image.width": "100%",
"zeppelin.R.render.options": "out.format \u003d \u0027html\u0027, comment \u003d NA, echo \u003d FALSE, results \u003d \u0027asis\u0027, message \u003d F, warning \u003d F",
"zeppelin.R.cmd": "R"
},
"interpreterGroup": [
{
"class": "org.apache.zeppelin.spark.SparkInterpreter",
"name": "spark"
},
{
"class": "org.apache.zeppelin.spark.SparkSqlInterpreter",
"name": "sql"
},
{
"class": "org.apache.zeppelin.spark.DepInterpreter",
"name": "dep"
},
{
"class": "org.apache.zeppelin.spark.PySparkInterpreter",
"name": "pyspark"
},
{
"class": "org.apache.zeppelin.spark.SparkRInterpreter",
"name": "r"
}
],
"dependencies": [],
"option": {
"remote": true,
"perNoteSession": false,
"perNoteProcess": false,
"isExistingProcess": false,
"port": "-1"
}
}
InterpreterSettings实例被InterpreterFactory对象初始化并填充。
多个note时,究竟是为每个note创建不同的interpreter进程还是共享同一个interpreter进程,zeppelin UI上提供了三种不同的模式可供选择:
Shared模式
一种解释器只有一个Interpreter进程,并且该进程中只有一个InterpreterGroup,所有的Interpreter实例都从属于该InterpreterGroup,当然,也肯定在同一个进程内部。多个note之间,可以很容易的共享变量。
Scoped模式
一种repl解释器只有一个Interpreter进程,但是与Shared模式不同,会创建多个InterpreterGroup,每个note关联一个InterpreterGroup。这样每个note相当于有了自己的session,session与session相互隔离,但是仍然由于这些InterpreterGroup仍然在同一个进程中,仍然可以在它们之间共享变量。

Isolated模式
独占式,为每个note创建一个独立的intepreter进程,该进程中创建一个InterpreterGroup实例,为该note的服务的Interpreter实例从属于该InterpreterGroup。
SparkInterpreter的Shared/Scoped/Isolated模式
以SparkInterpreter为例,说明这三种模式对SparkContext和Scala repl共享方式上的差别:
SparkInterpreter Shared
所有的note共享同一个SparkContext和Scala REPL实例,因此,如果其中一个note定义了变量a,另外一个note可以访问并且修改该变量a。
SparkInterpreter Scoped
所有的note共享同一个SparkContext,所有的spark job都是通过同一个SparkContext提交的,但是不同的Scala repl解释器,由于不同享Scala repl,故不存在一个note访问并修改了另一个note定义的变量的问题。
SparkInterpreter Isolated
独占式,每个note都有自己的SparkContext和Scala repl,不共享。
InterpreterOption
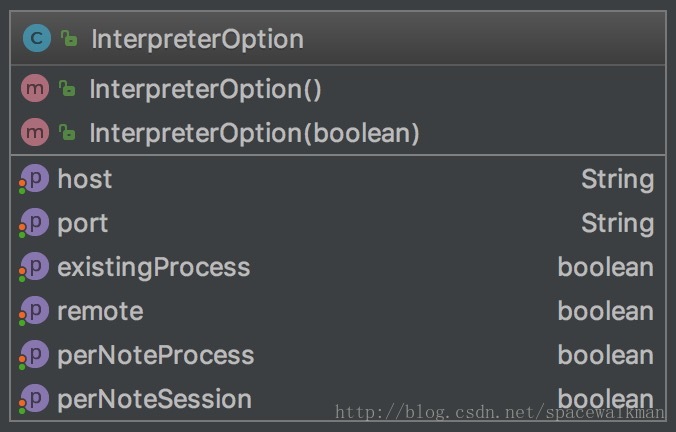
虽然InterpreterOption是一个简单的POJO,但是其字段取值,直接决定了zeppelin在创建interpreter进程时的处理方式,直接体现了”性能和资源占用之间进行trade-off”多种策略:
| property | 含义 | 说明 |
|---|---|---|
| existingProcess | 是否连接已有intepreter进程 | intepreter进程可以独立启动,如在远程(不同与zeppelin运行的其他host)节点上,可以采用该手段将repl进程进行分布式部署,并且先于zeppelin启动,让zeppelin连接到这些已有的线程,以解决intepreter进程横向扩展的问题。该模式需要显式指定host和port,表示zeppelin主进程(ZeppelinServer所在进程)与该interpreter进程进行的IPC时,通信的socket。 |
| perNoteProcess | 每个Note创建一个IntereterGroup进程 | 这是最细粒度的interpreter进程创建方式,同时也是最粗放的资源使用的方式,如果interpreter都在运行zeppelin的host上启动的话, note数量很多的话,很可能造该host内存耗尽 |
| perNoteSession | 每个Note的在同一个IntereterGroup进程中创建不同的Interpreter实例 | 创建interpreter进程时只创建一个,但是在该进程内部,创建不同的interpreter实例。这种方式比perNoteProcess要节省内存资源。 |
InterpreterSettings是InterpreterOption的使用方,重要的地方见其getInterpreterGroup和getInterpreterProcessKey方法:
1 | private String getInterpreterProcessKey(String noteId) { |
InterpreterFactory
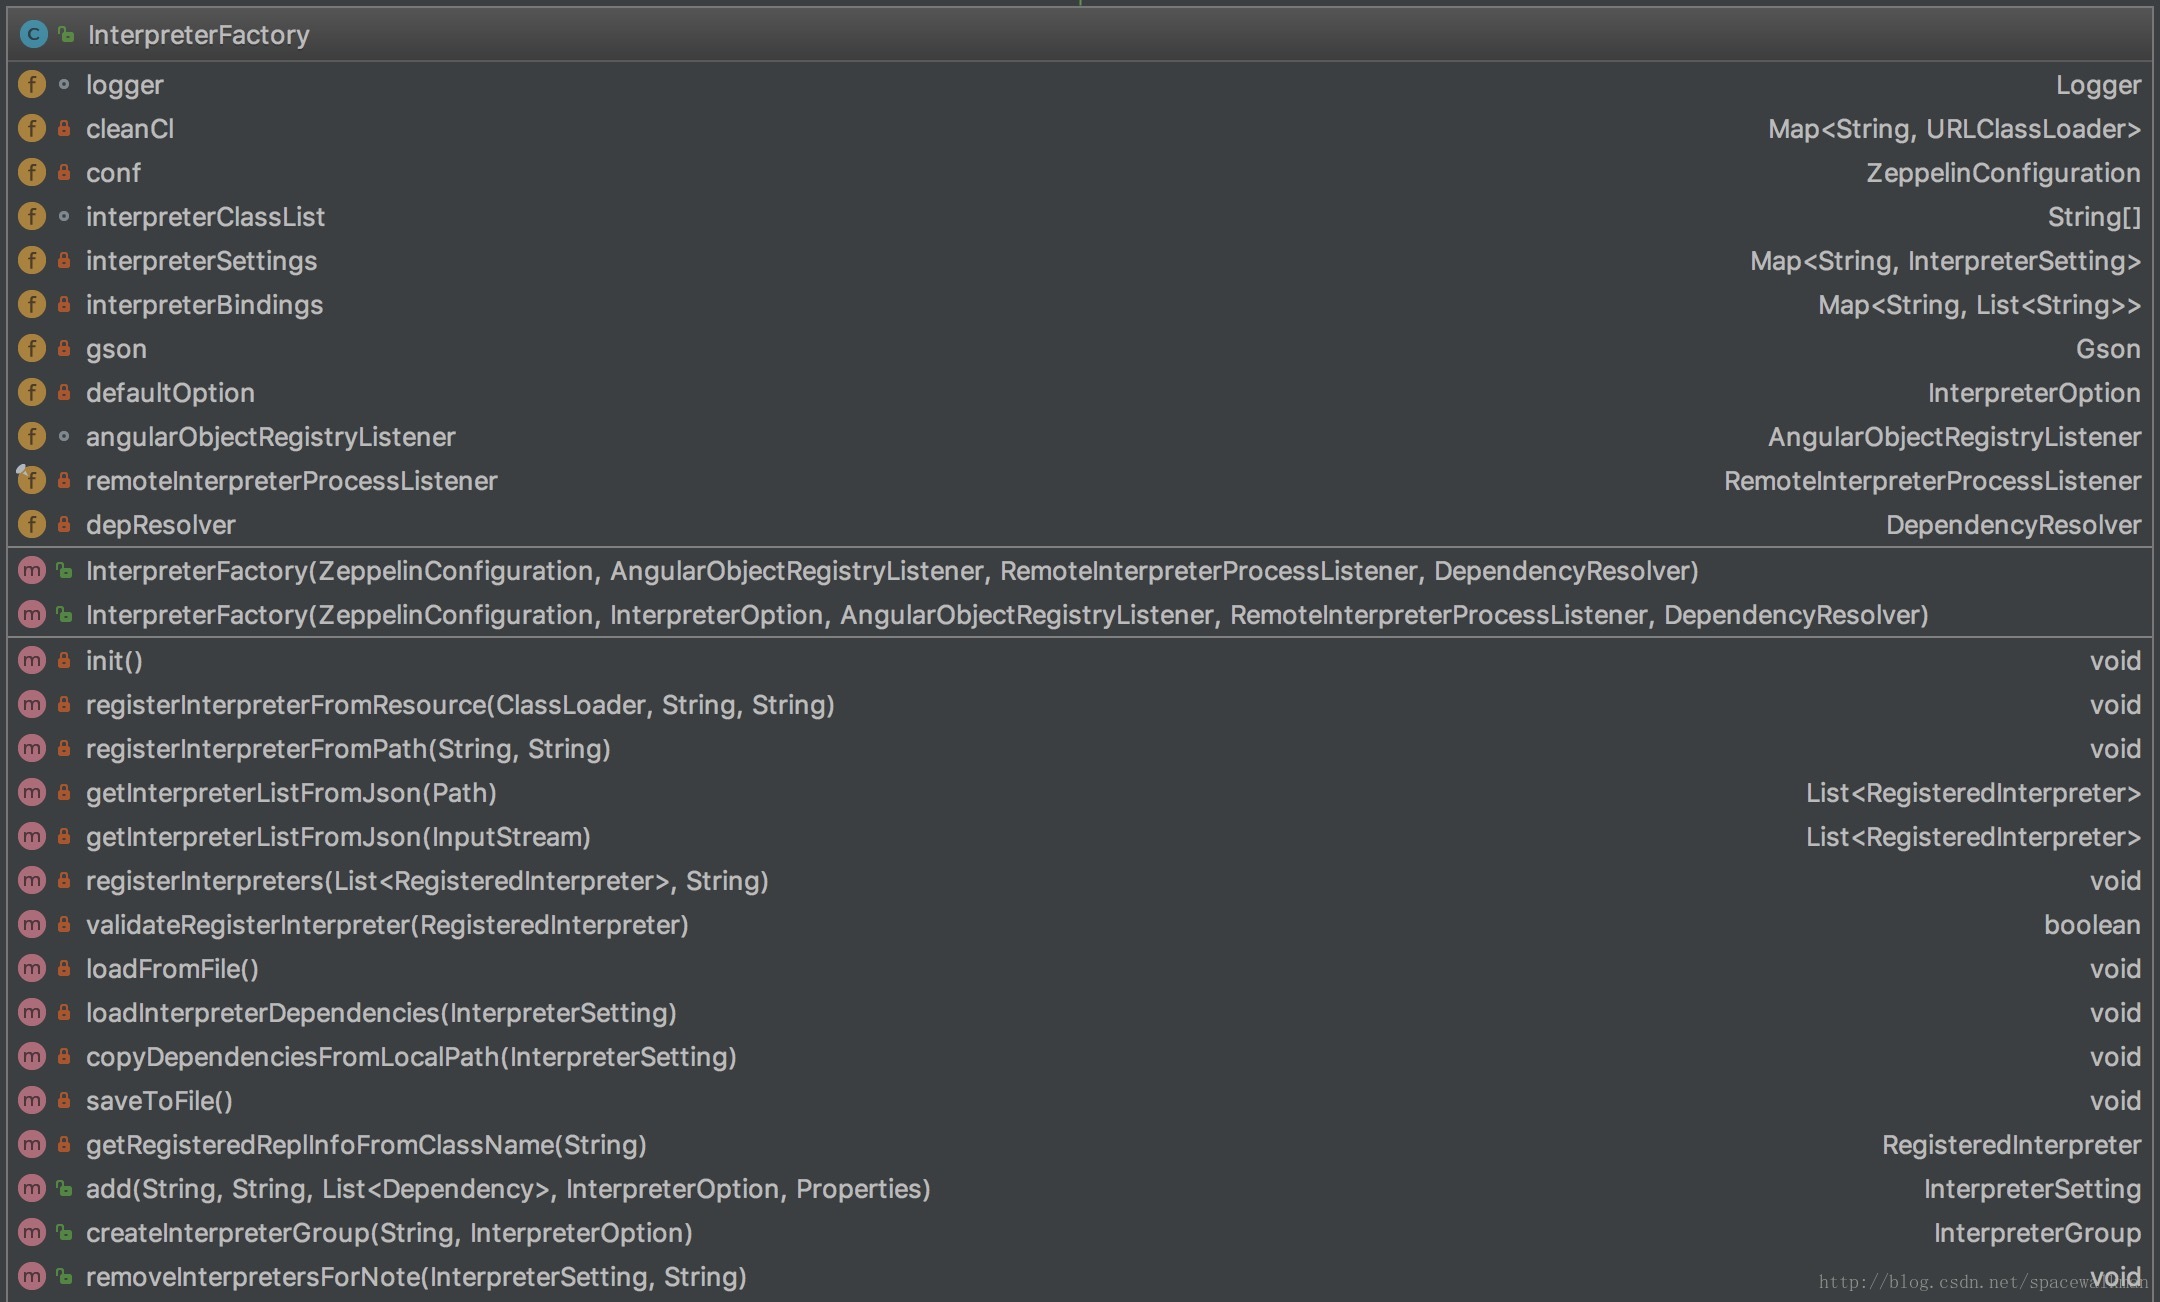

InterpreterFactory是InterpreterGroupFactory的实现类,承担如下职责:
- interpreter实例的实际创建者
- interpreter配置文件的加载与持久化,如loadFromFile()和saveToFile()
- interpreterSettings的管理
- 第三方依赖加载器
- 在zeppelin主进程中建立远程AngularObjectRegistry的本地Proxy——RemoteAngularObjectRegistry,以保证远程interpreter进程与前端angular对象双向绑定。
InterpreterFactory实际执行创建interpreter实例的方式为createInterpretersForNote,具体实现如下:
1 | public void createInterpretersForNote( |
以下是createRemoteRepl方法实现,重点是用LazyOpenInterpreter Proxy了一个RemoteInterpreter实例:
1 | private Interpreter createRemoteRepl(String interpreterPath, String noteId, String className, |
InterpreterFactory执行解除note和interpreter实例之间的关系方法见removeInterpretersForNote:
1 | public void removeInterpretersForNote(InterpreterSetting interpreterSetting, |
接下来,我们主要讲解图中右下角部分class,这些class主要决定了Note的运行机制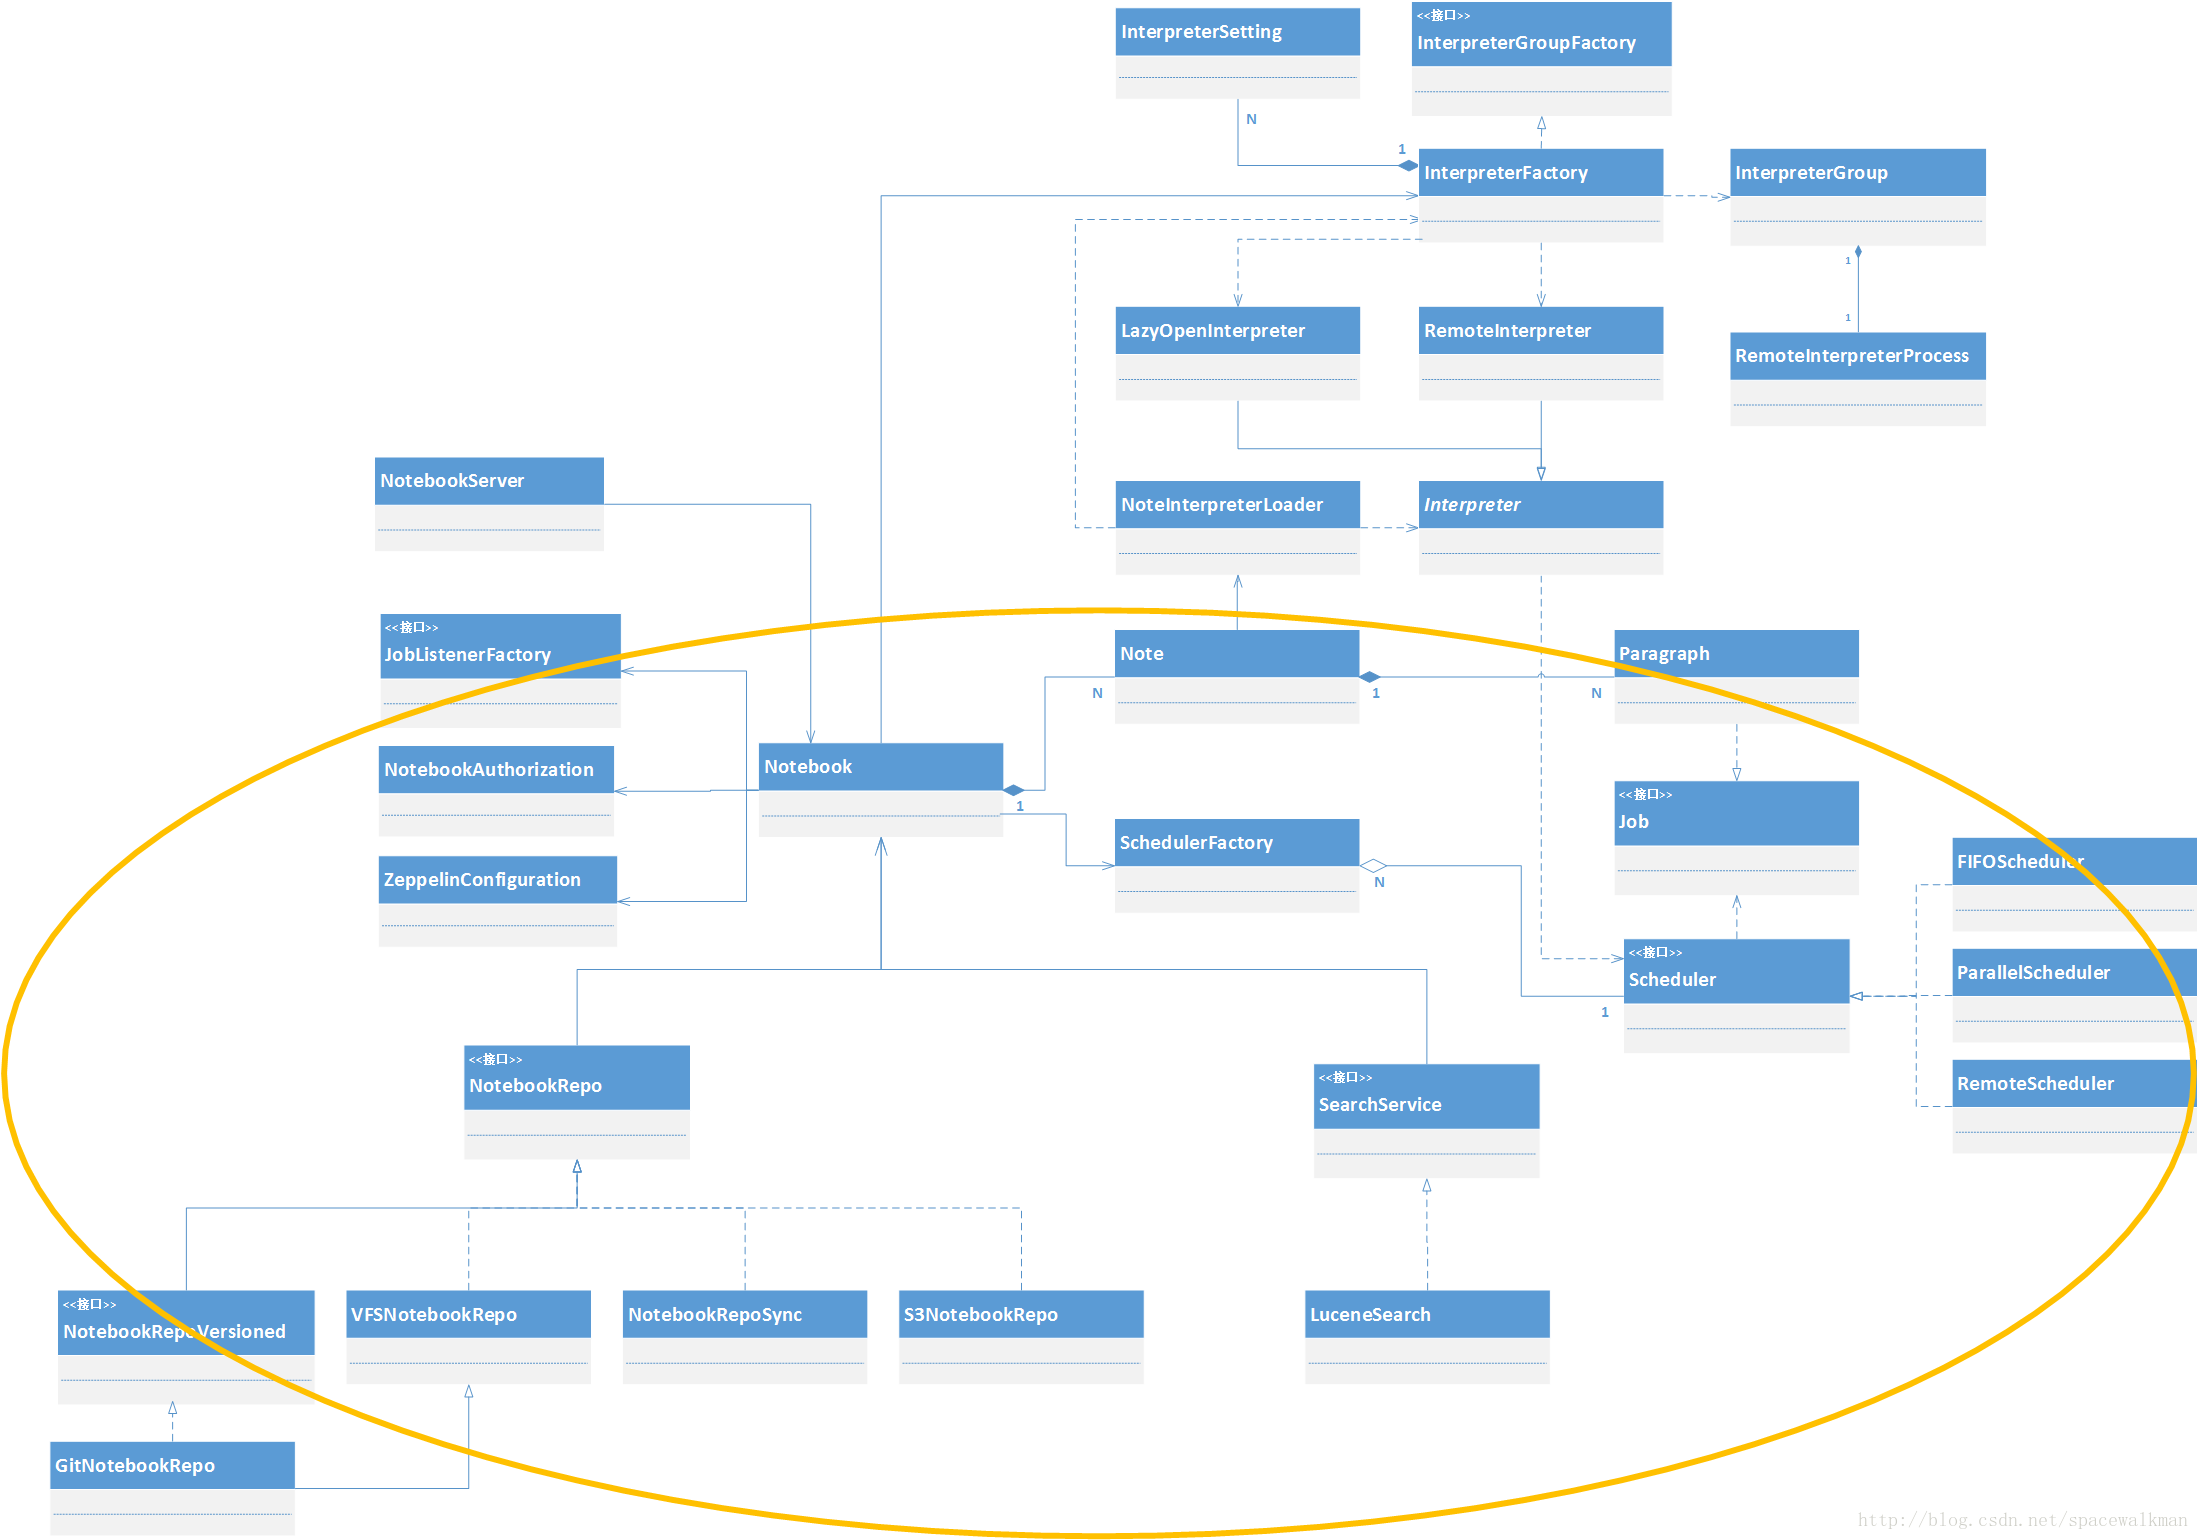
Note
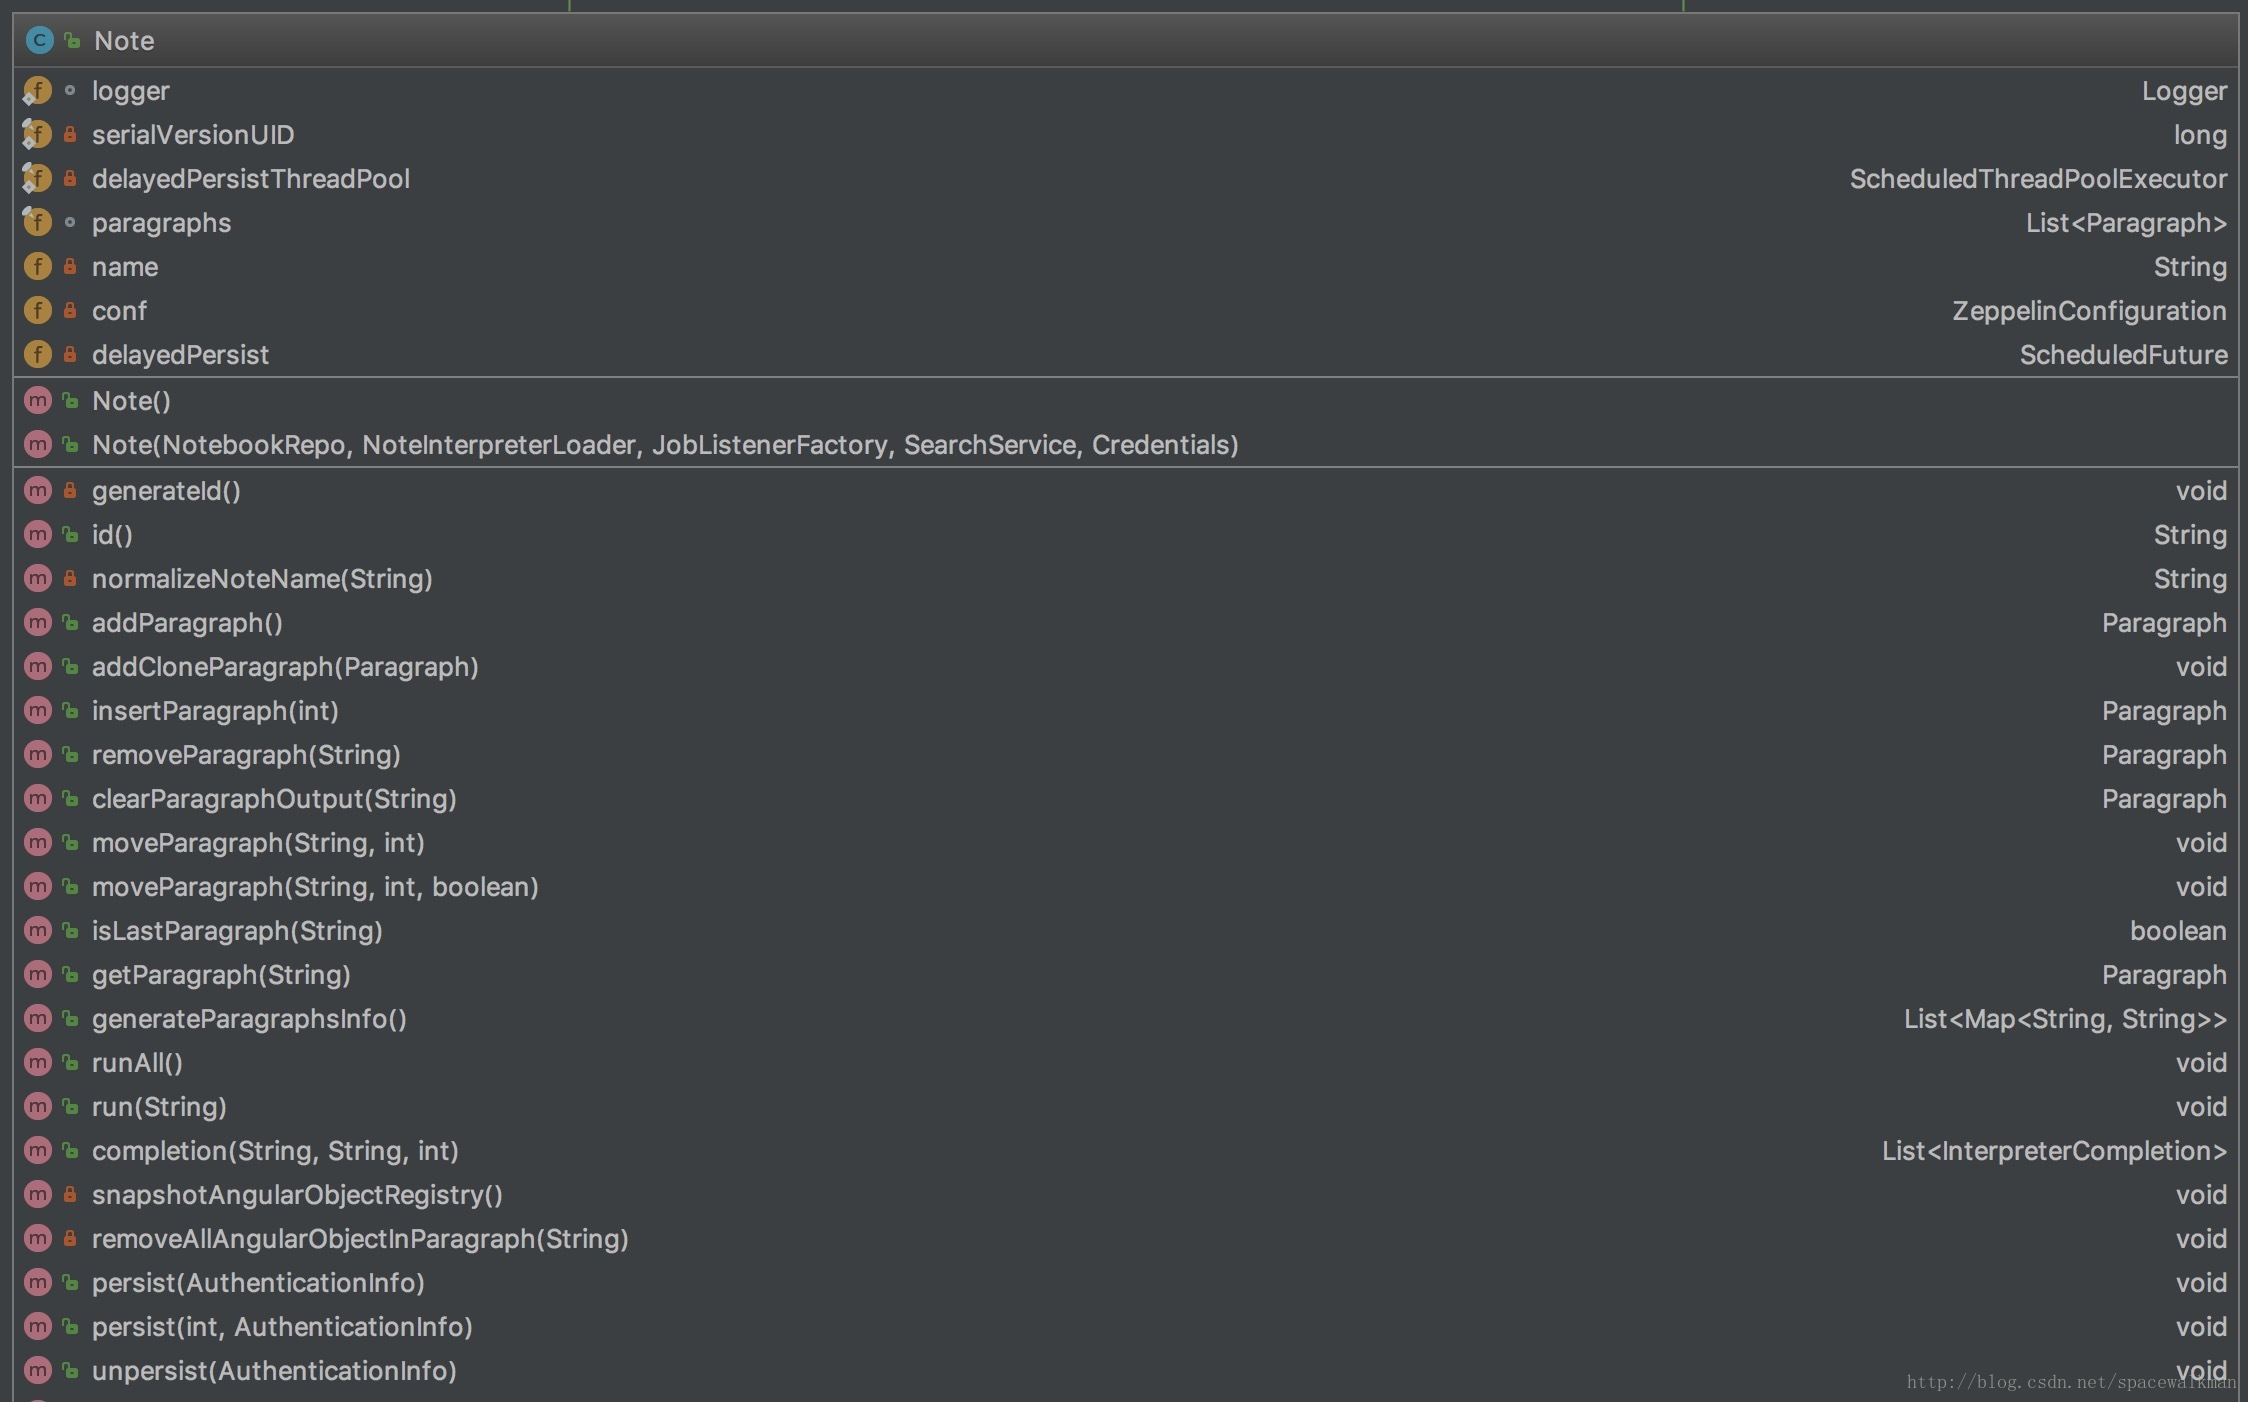

Note是单个’记事本’的内存对象,是zeppelin管理的最小单位,无论是做权限控制、共享、还是持久化,都是以Note为粒度的。从类关系上看,Note是由一些列的有序Paragraph组成,因此其绝大部分职责都是与管理Paragraph有关:
- Paragraph的CRUD、相对顺序控制
- 与处理前后端数据双向推送的AngularObject的管理
- 整体和单个Paragraph 执行,以及执行过程的基于Observer模式的执行过程Hook
- Note基本的样式外观控制
为了“分离关注点”,其他的功能,如:
- Note相关的Interpreter加载和初始化
- 持久化与反持久化,包括延迟持久化
- 权限控制
都交给Note“依赖的服务”来解决,这些服务在运行时,会由“组合”Note的Notebook类来负责注入。这些依赖的注入顺序为:

Paragraph
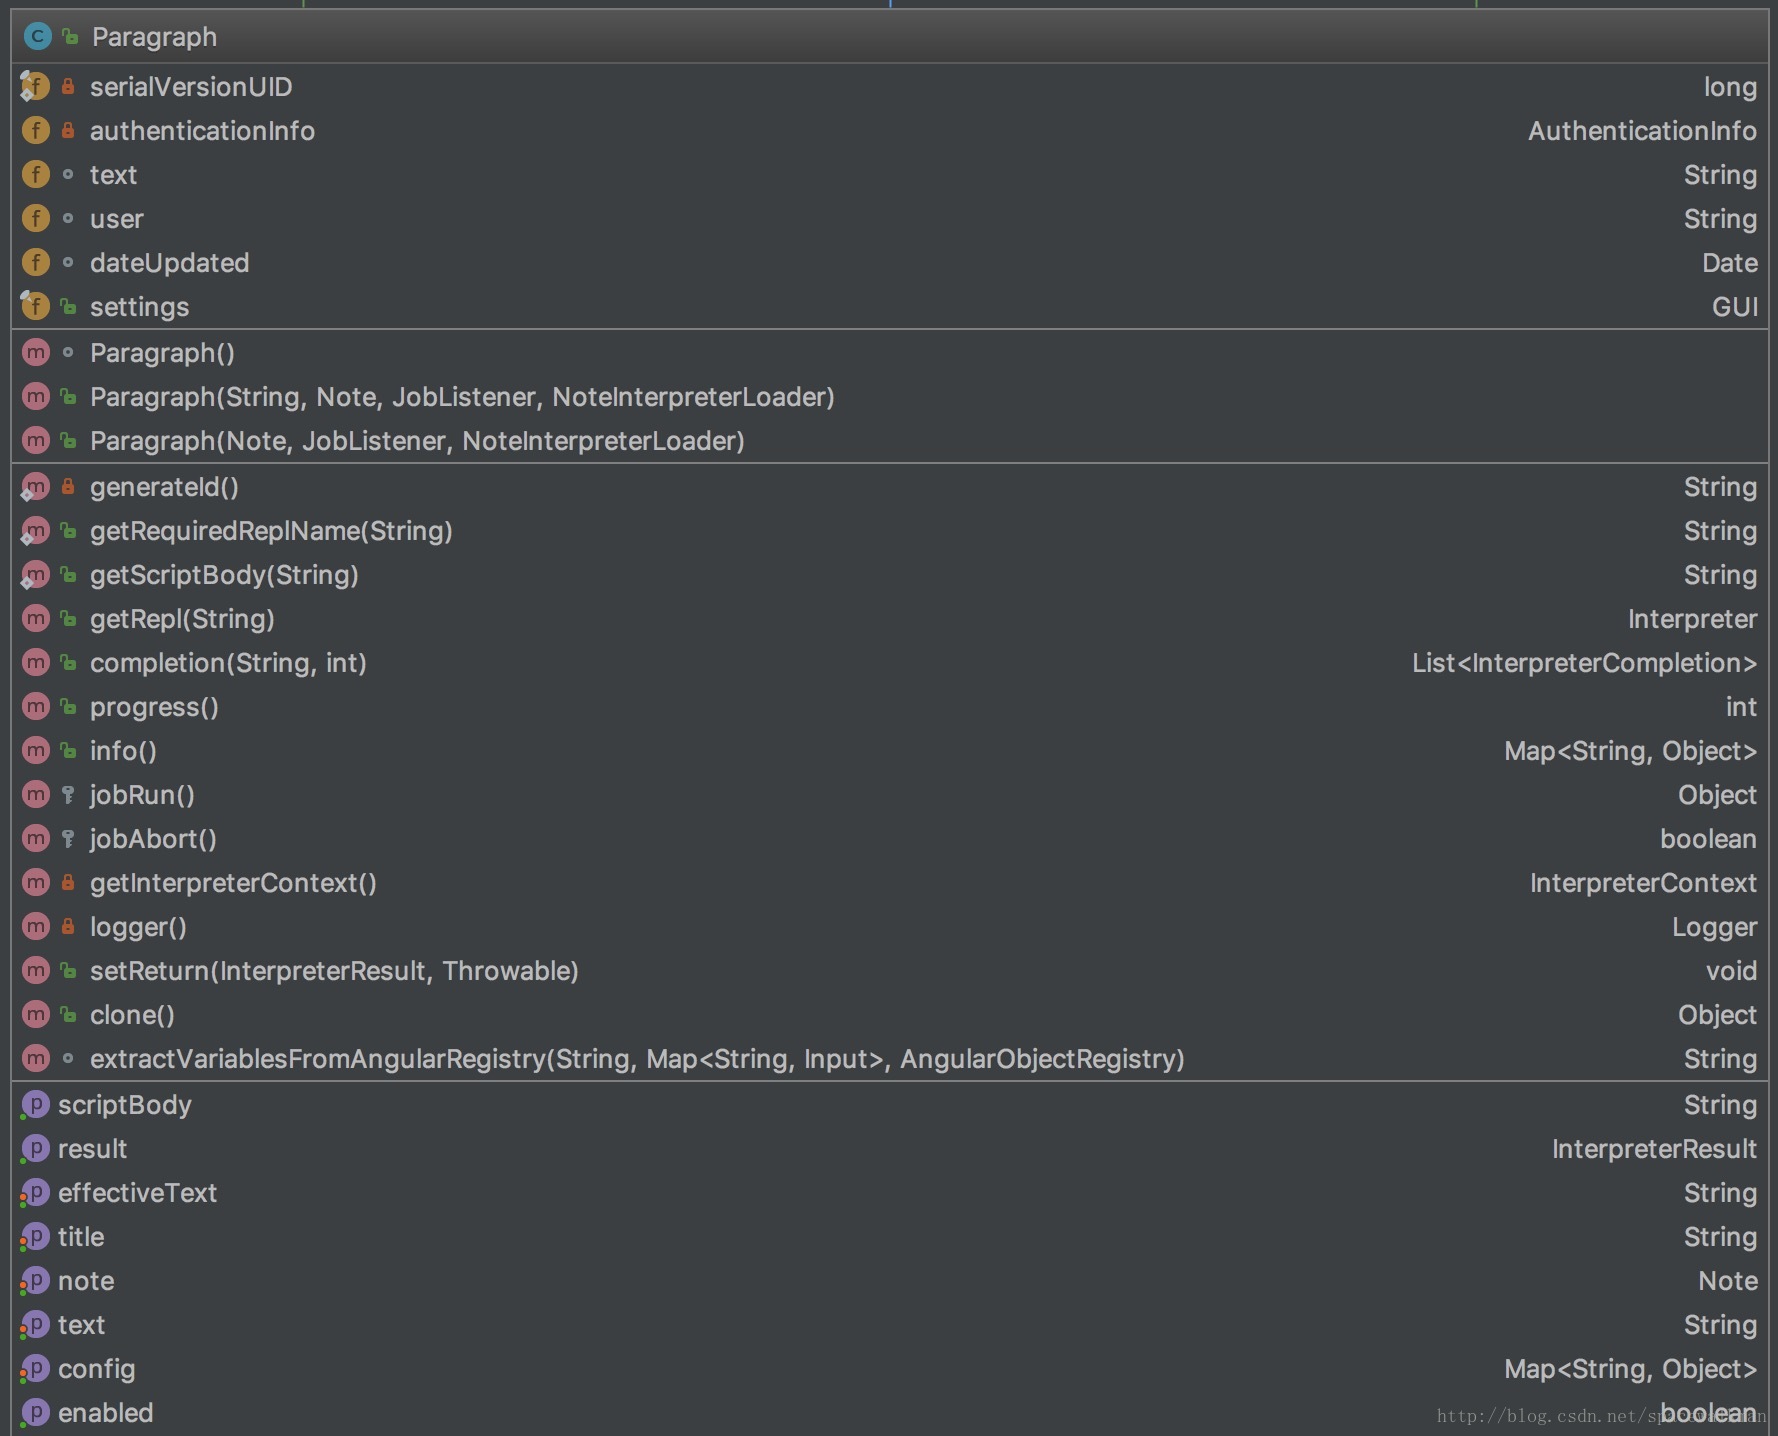

Paragraph代表着一段代码以及支撑其执行所需要的“环境信息”,是代码执行的最小单位。Paragraph的职责如下:
- 获取代码文本,并解析分离类似%spark的interpreter声明段和可执行代码段。
- 代码执行,以及执行过程控制(进度和终止)
- 代码执行结果获取
- 代码中变量查找以及替换
Notebook
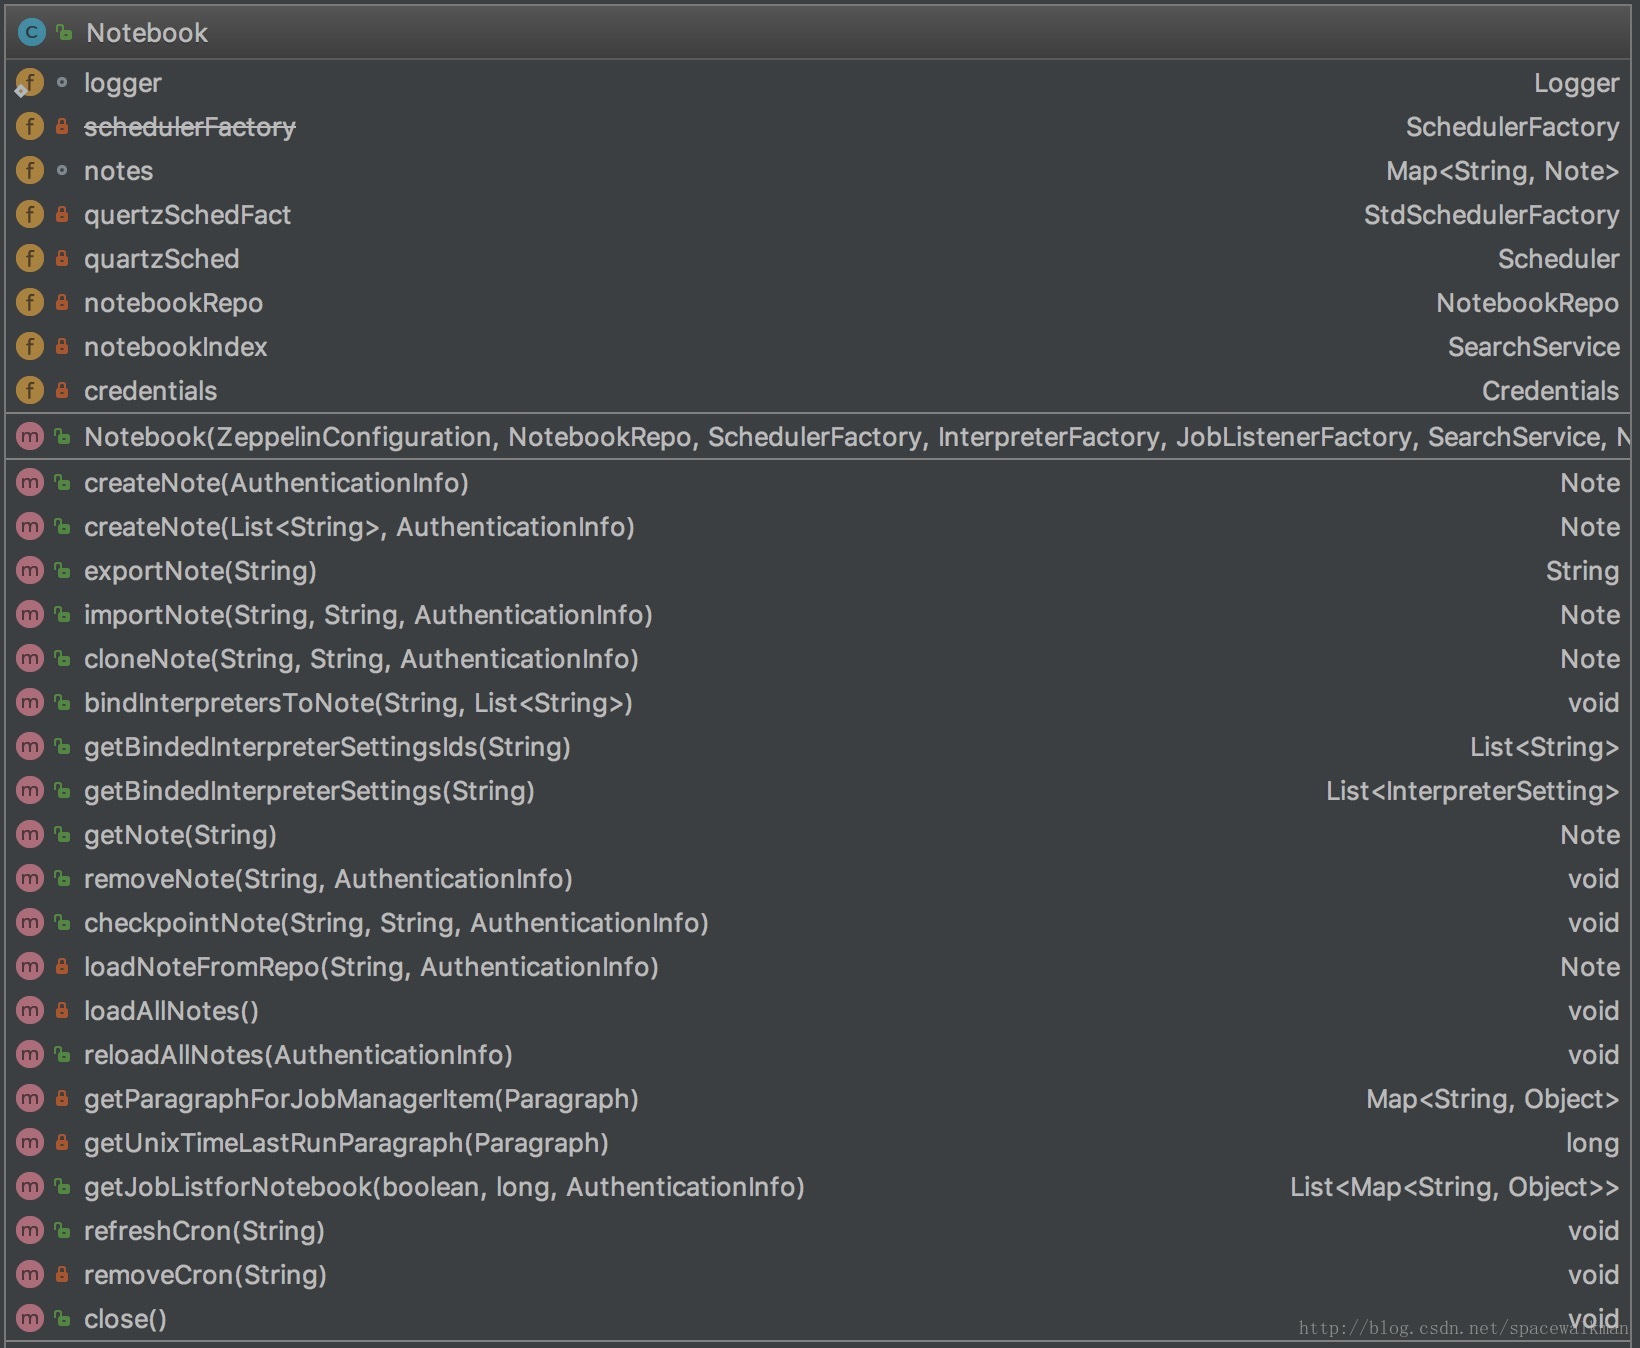

Notebook实际上是Note的Manager,职责如下:
- Note的CRUD,克隆、导入/导出
- Note和相关Interpreter配置时和运行时映射关系维护
- Note cron式调度执行控制
其他所有Note公共的服务,都交给ZeppelinServer类来注入,具体的有:
| 服务 | 说明 |
|---|---|
| NotebookRepo | Note的持久化服务 |
| SearchService | Note的全文检索服务 |
| NotebookAuthorization | Note的Authorization服务 |
| Credentials | 数据源相关的“用户/密码”服务 |
NotebookServer
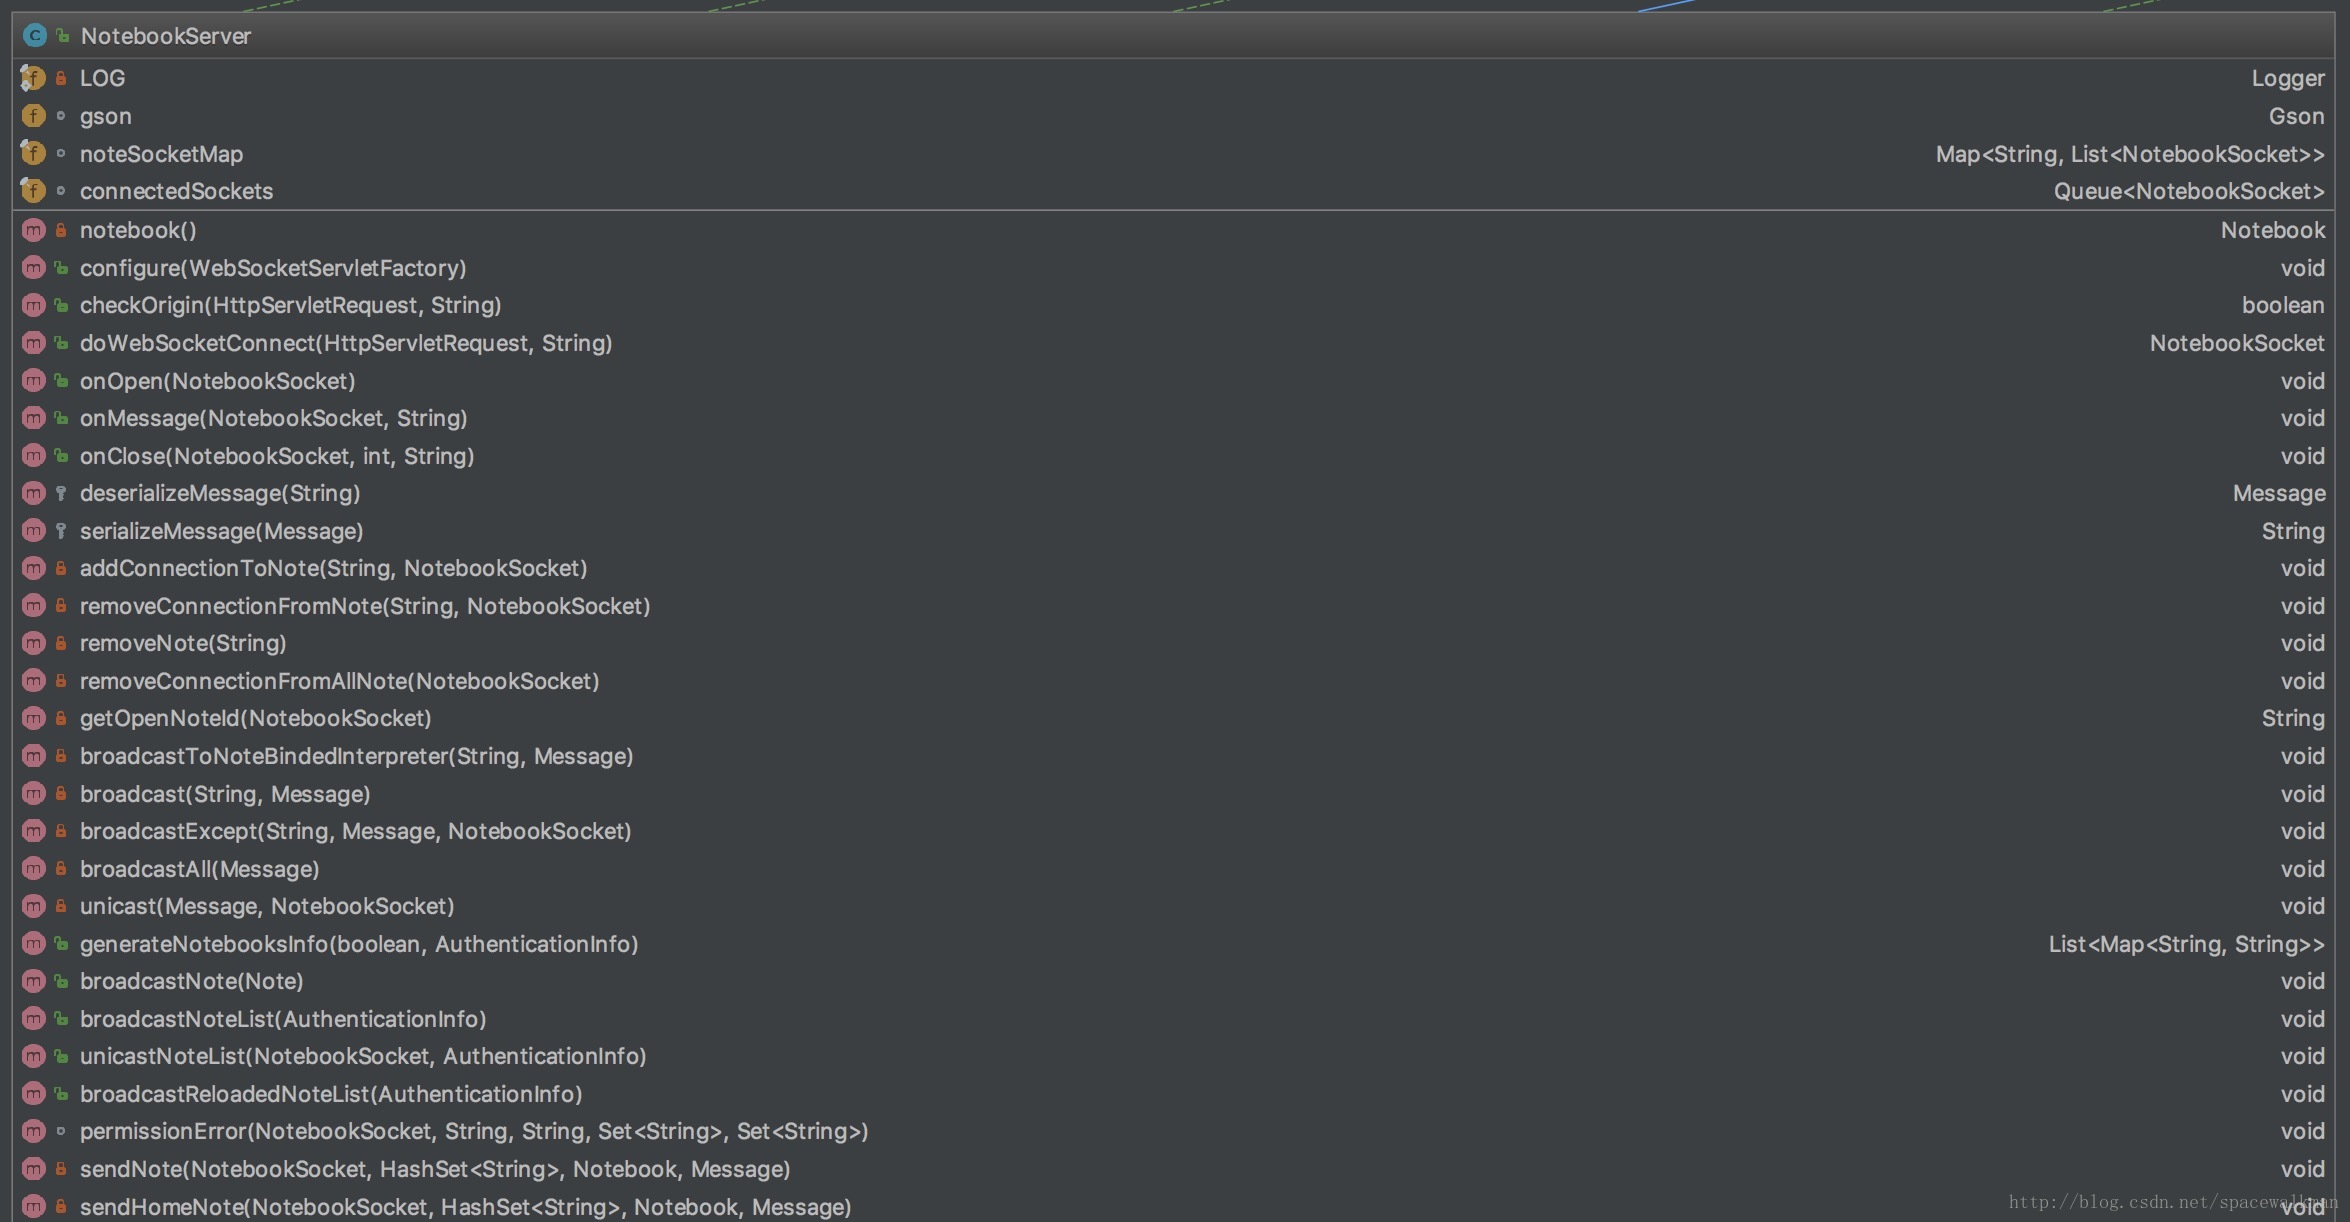
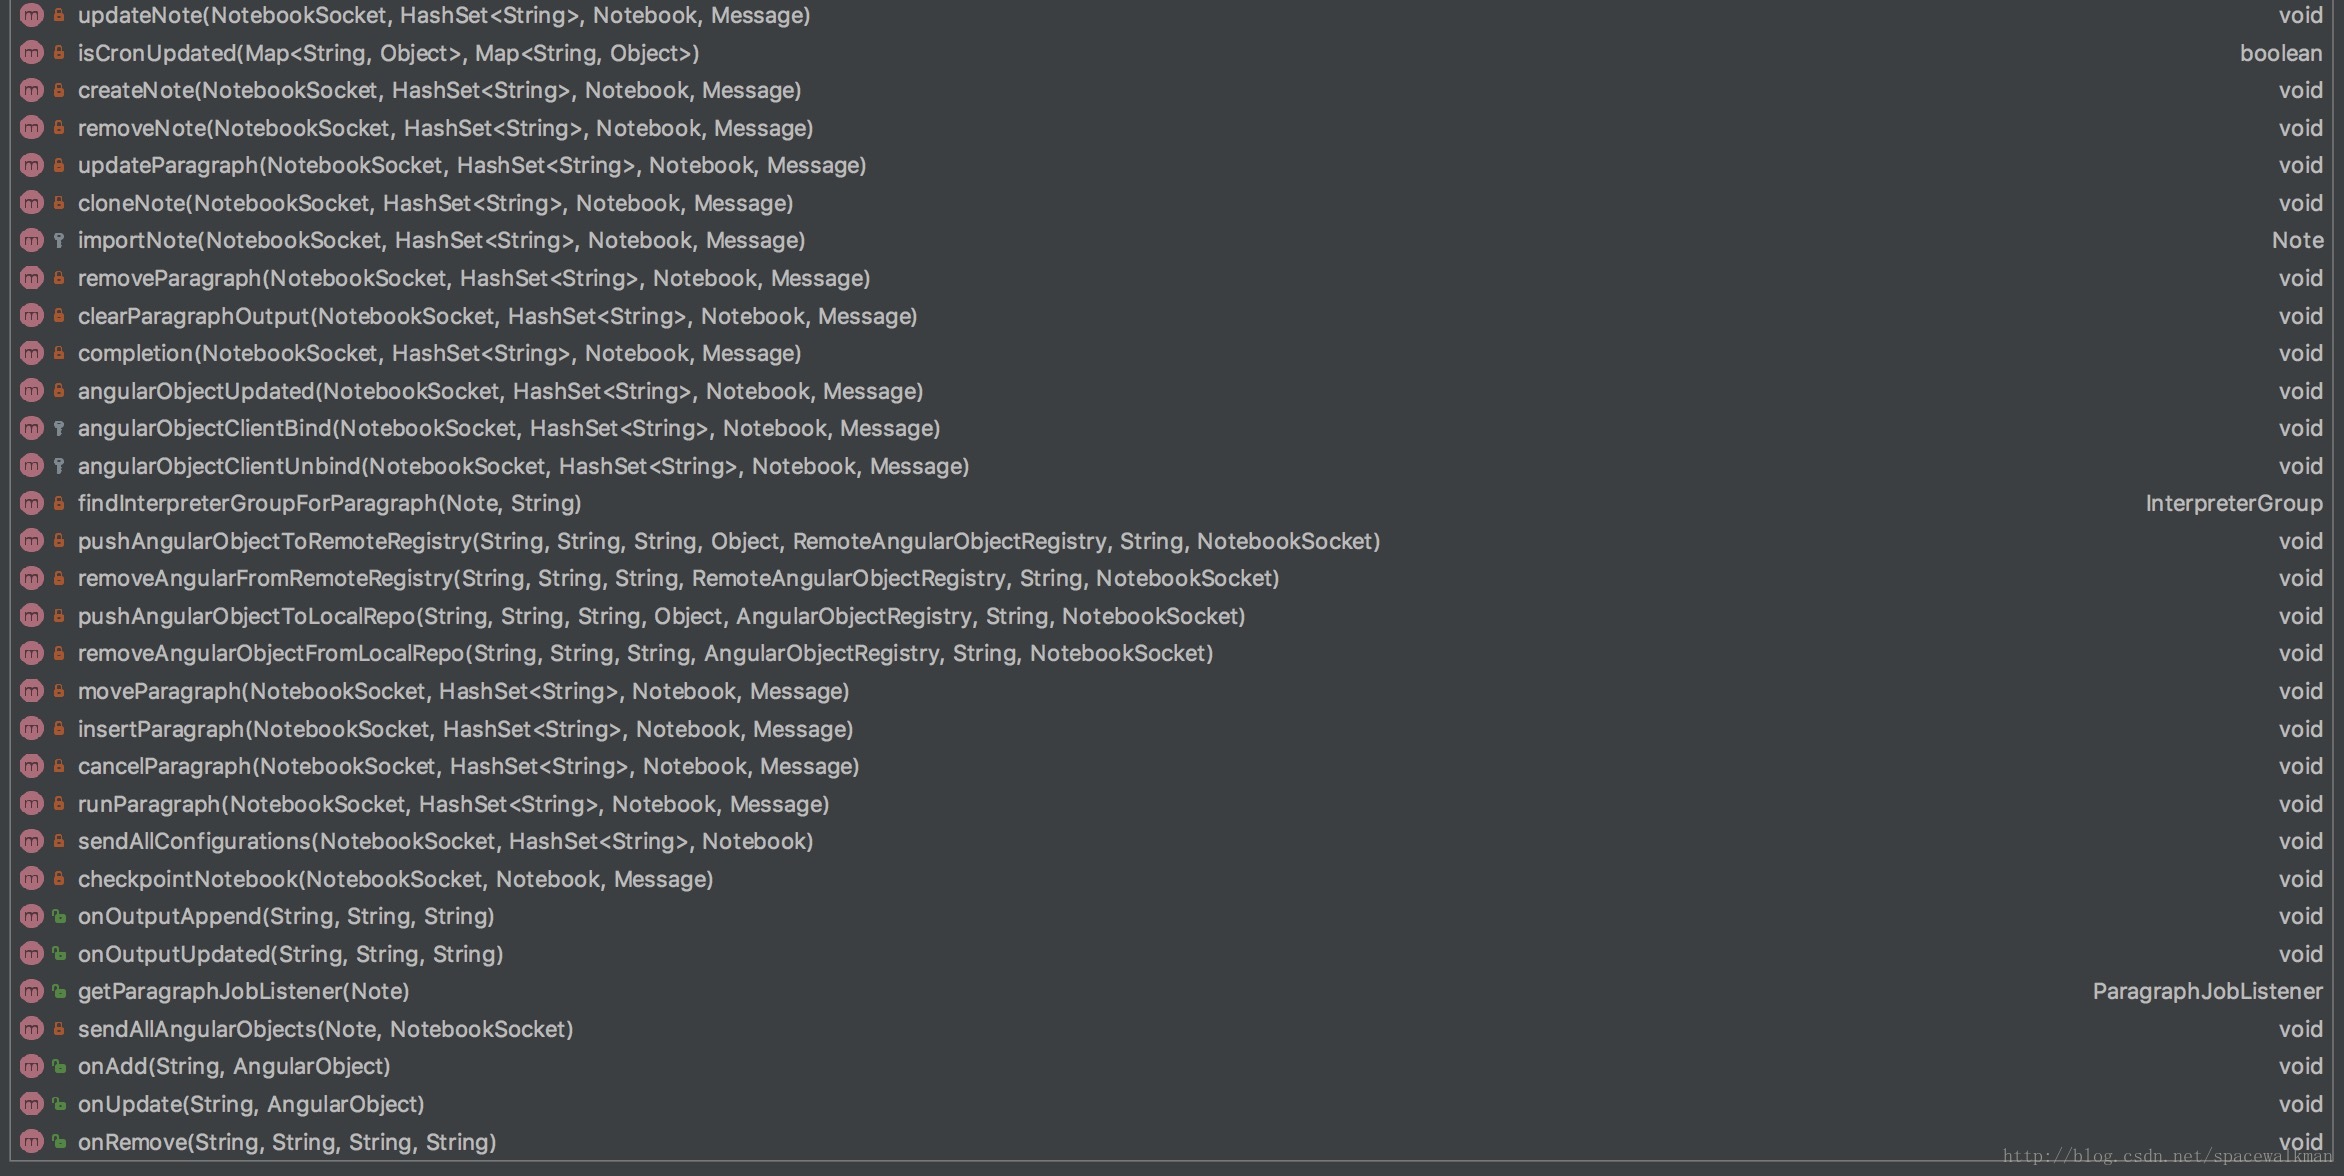
NotebookServer的主要功能是将Notebook、Note、Paragraph、Interpreter等类封装的能力,通过WebSocket的形式对web 客户端提供出去,所以其具体的职责包括:
- 维护WebSocket连接与Note之间映射关系
- 处理客户端和服务器之间的双向通信(通过WebSocket,具体的通信协议见:Message类),包括消息的序列化/反序列化,消息解析和服务端处理、处理结果的向客户端广播/单播发送等。
- Note的CRUD操作以及Paragraph的CRUD操作、执行、导入、导出时的权限控制
- 前后端AngularObject的双向bind处理
- WebSocket客户端合法性校验(checkOrigin)
关于zeppelin采用WebSocket技术的必要性问题,这里也做一下简单分析。zeppelin是共享式、Notebook式的大数据分析环境,以repl的方式执行以Paragraph为最小粒度的代码段。
- 首先repl的方式强调实时反馈执行结果,特别是在大数据环境下,一段代码可能需要执行很长时间,在执行的过程中,zeppelin的用户期望看到执行进度和中间结果,需要在前后端之间建立一个长连接,便于实时传递数据。
- 另外zeppelin的另一个亮点是其结果可视化能力,需要在前后台传递图片,并且支持较大数据量的传输的能力(相对传统http技术)
- 再者,由于是共享式环境,一个Note可能被多个用户同时看到、甚至编辑,需要在各个已经打开了同一个Note的web客户端之间同步Note的代码、执行结果和进度信息。
ZeppelinServer
ZeppelinServer是各个组件的”组装者”,它是系统的主入口,职责如下:
- 内嵌jetty服务器,支持以WebSocket和REST两种方式对外暴露系统功能
- 创建NotebookServer实例,建立起处理WebSocket Connection和消息处理的服务端
- 创建Notebook需要的相关依赖,如Note持久化服务(NotebookRepo)、Note的全文索引服务(SearchService),并完成向Note、Paragraph的注入。
- Note权限配置文件的加载以及初始化
- InterpreterFactory的初始化
- 初始化动态依赖加载器(DependencyResolver)
NotebookRepo以及Note持久化子系统
Notebook的持久化子系统主要由NotebookRepo以及其子类组成。各类主要的职责如下:
- NotebookRepo是顶层接口,规定了持久化层基本的CRUD接口。
- NotebookVersioned定义了Note的版本管理接口,目前其实现类只有 GitNotebookRepo。GitNotebookRepo是以JGit库实现的基于本地文件系统的、支持以Note为粒度进行checkin和show log的Note仓库。
- VFSNotebookRepo是zeppelin的默认实现类(配置参数zeppelin.notebook.storage控制,参见:ZeppelinConfiguration。
1 | ZEPPELIN_NOTEBOOK_STORAGE("zeppelin.notebook.storage", VFSNotebookRepo.class.getName()), |
使用apache common-vfs来实现多文件系统支持。
- NotebookRepoSync的初衷是为了让2个NotebookRepo之间进行自动同步修改,实现:在本地repo保存修改的同时,让zeppelin自动将修改同步到远程的repo上。
要启用2个repo之间的同步,做如下修改:
- 在zeppelin-site.xml中修改配置参数zeppelin.notebook.storage,以逗号分隔2个实现类的完整类名
- 注意顺序,一般是将VFSNotebookRepo作为一个,而S3NotebookRepo或者是AzureNotebookRepo等作为第二个。zeppelin目前只支持最大2个Repo(maxRepoNum=2作为编译时常量),不能通过配置修改。
- S3NotebookRepo和AzureNotebookRepo,实现向2大云存储系统的持久化Notebook。
- ZeppelinHubRepo是为了向zeppelinhub持久化Notebook而设计的,zeppelinhub是一个类似于Github的分享网站,区别在于Github是分享git仓库的,zeppelinhub是分享note的。
SearchService以及Note的全文检索子系统
Note的全文检索子系统由SearchService接口和其子类组成,目前只有一个实现类LuceneSearch,采用基于内存的索引,在Notebook每次重新加载所有的Note、或者Note有更新、删除的时候会重新索引该Note,保证全文索引与持久化的Note文件一致性。
截止目前为止,zeppelin的所有重点的类我们就分析完了。通过分析单个类的职责和类之间的关系,我们清楚的了解了zeppelin如何将自己要解决的主要问题——支持多个语言repl的解释器——这个庞大的目标,一步步进行关注点拆分,并且合理的组合到各个类,乃至各个模块中,形成一个可实现的设计方案。